Building Ubuntu Server 24.04 Templates for Proxmox with Packer


🚀 Introduction
I'm planning on setting up a k3s cluster and Windows Server environment in my homelab, which means I need to provision quite a few VMs. Clicking through installers definitely isn't very "as code" 😅, so I've turned to Packer to build VM templates with the idea that I can prepare VM templates with remote management enabled by default.
Now Ubuntu offers Ubuntu Cloud Images which can easily converted into Cloud-Init Templates for use with Proxmox. But but since I'll need custom images for Windows anyway I figured I'd build my own Ubuntu templates too. Its a good opportunity to get some more experience with Packer and gives me full control over the template creation process.
Packer is part of the HashiCorp suite of tools designed for modern infrastructure automation. It complements other IaC tools like Terraform and Ansible in a comprehensive code-based infrastructure ecosystem.
🎯 My Requirements for VM Templates
I have two simple requirements for my VM templates:
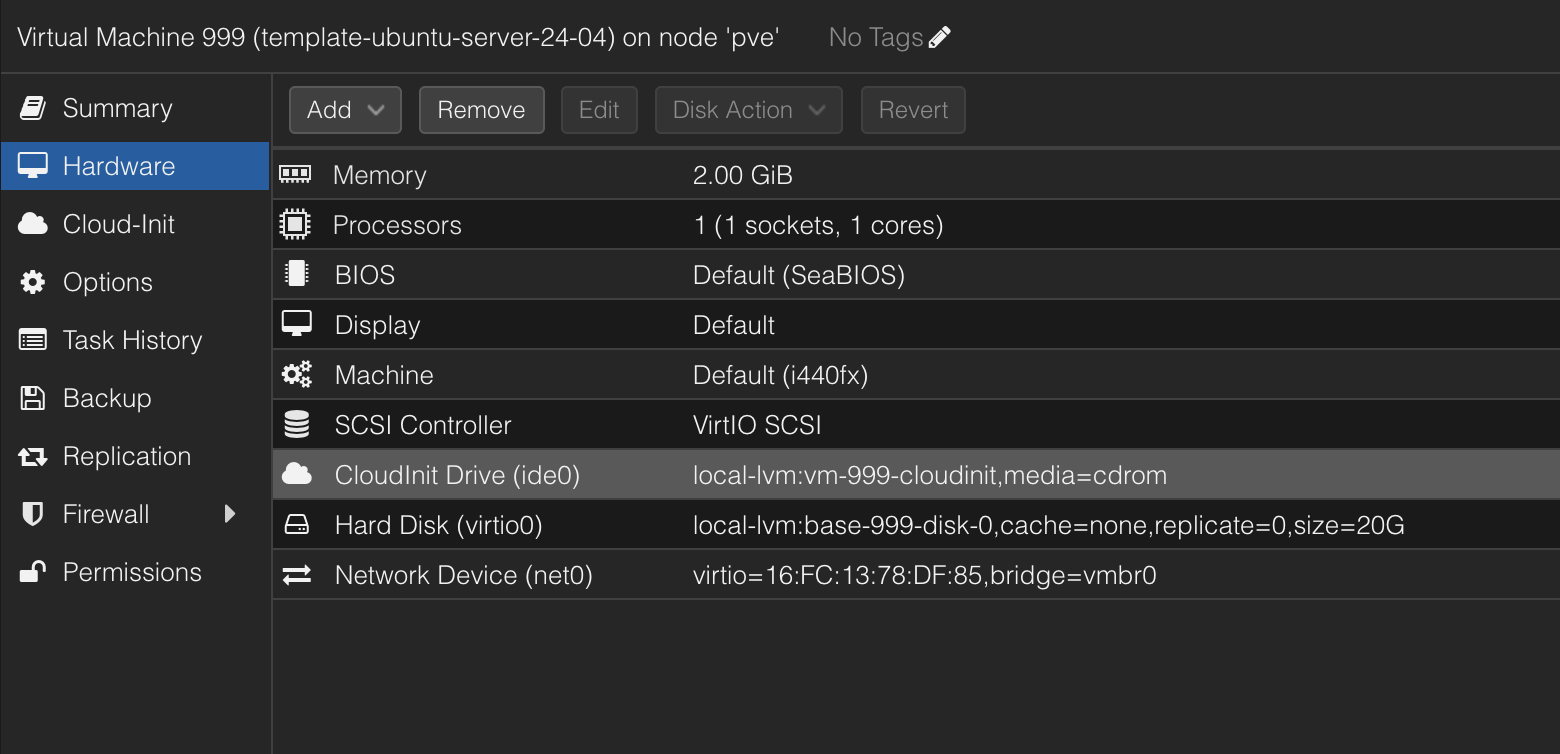
- Proxmox Cloud-Init Support - Templates must work seamlessly with Proxmox's cloud-init implementation, allowing me to set usernames and SSH keys when cloning a Proxmox Template either via the GUI or Terraform.
Ubuntu 18.04 and later supports cloud-init natively, so we don't need to do anything special here, other than ensuring the VM template contains a CD-ROM drive, which will be used to pass the Cloud-Init data from Proxmox to the VM.
- QEMU Guest Agent - I want to pre-install the QEMU guest agent for better VM management and monitoring. This is important for things like live migration, shutdown, and snapshotting. The QEMU guest agent is a daemon that runs inside the VM and communicates with the Proxmox host, providing information about the VM's state and allowing for better integration with the hypervisor.
Cloud Init
Before we get into things a quick word about Cloud-Init.
Cloud-init is the industry standard method for instance initialisation. It is supported across all major public cloud providers, provisioning systems for private cloud infrastructure, and bare-metal installations.
During boot, cloud-init identifies the cloud it is running on and initializes the system accordingly. Cloud instances will automatically be provisioned during first boot with networking, storage, SSH keys, packages and various other system aspects already configured.
Proxmox uses the NoCloud datasource to provide cloud-init with the necessary configuration data. The NoCloud datasource allows you to provide configuration data either via a local file from a URL.
The Cloud Init datasource documentation is an interesting read for learning how other cloud providers pass configuration to the Virtual Machines.
🔐 Security and Authentication
Ok now we are ready to start making our Packer template, but first we need to authenticate to our Proxmox node
We need to authenticate with the Proxmox API to create and manage VMs. The recommended way to do this is by using an API token, which can be created in the Proxmox web interface.
Never commit credentials or sensitive tokens to your git repository! Always use environment variables or secure vaults for authentication information.
-
Authentication credentials are stored in environment variables:
PROXMOX_URL="https://<server>:<port>/api2/json"
PROXMOX_USERNAME="<username>"
PROXMOX_TOKEN="<token-guid>" -
Configuration variables are in a
.auto.pkrvars.hclfile (excluded from git):proxmox_node = "pve"
ssh_username = "superadmin"
ssh_authorized_keys = ["ssh-rsa AAAAB3Nz..."]
🛠️ The Installation Process
The Packer process follows these steps:
- Start VM: Boots a VM with the Ubuntu Server 24.04 ISO
- Autoinstall: Uses the boot command to trigger Ubuntu's autoinstall
- Cloud-Init: Configures the system using cloud-init
- Provisioning: Runs shell provisioners to clean up and prepare the VM
- Template Creation: Converts the VM to Proxmox VM template
🗂️ Repository Structure
My Packer template for Ubuntu Server 24.04 is organized as follows:
ubuntu-server-24-04/
├── README.md
├── ubuntu-server-24-04.pkr.hcl
├── variables.pkr.hcl
├── my.auto.pkrvars.hcl (excluded from git)
└── files/
    ├── 99-pve.cfg
    ├── meta-data
    └── user-data.pkrtpl.hcl
📄 1. Boot a VM with the Ubuntu Server 24.04 ISO
The main Packer configuration file ubuntu-server-24-04.pkr.hcl defines the VM template and its settings. It uses the proxmox-iso builder to create a VM from an ISO image.
packer {
  required_plugins {
    proxmox = {
      version = "~> 1.0"
      source  = "github.com/hashicorp/proxmox"
    }
  }
}

# Resource Definition for the VM Template
source "proxmox-iso" "ubuntu-server-noble" {

  insecure_skip_tls_verify = true
  node                     = var.proxmox_node

  # VM General Settings
  vm_id   = "800"
  vm_name = "ubuntu-server-noble"

  template_name        = "template-ubuntu-server-24-04"
  template_description = "Created by Packer on ${timestamp()}"

  # VM OS Settings
  boot_iso {
    type             = "scsi"
    iso_path         = "local:iso/ubuntu-24.04.2-live-server-amd64.iso"
    iso_storage_pool = "local"
    unmount          = true
  }

  # VM System Settings
  qemu_agent = true

  # VM Hard Disk Settings
  scsi_controller = "virtio-scsi-pci"

  disks {
    disk_size    = "20G"
    format       = "raw"
    storage_pool = "local-lvm"
    type         = "virtio"
  }

  # VM CPU Settings
  cores = "1"

  # VM Memory Settings
  memory = "2048"

  # VM Network Settings
  network_adapters {
    model    = "virtio"
    bridge   = "vmbr0"
    firewall = "false"
  }

  # VM Cloud-Init Settings
  cloud_init              = true
  cloud_init_storage_pool = "local-lvm"

...
}
📦 Use the boot command to trigger Ubuntu's autoinstall
We are going to provide autoinstall with a cloud-init configuration file. This is where we can set up the SSH keys, timezone, and other system settings.
To do this we use the boot_command parameter. This parameter defines the sequence of keystrokes that Packer will send to the VM during the boot process. Here we escape the GUI installer and use the autoinstall method.
Packer will automatically populate the {{ .HTTPIP }} and {{ .HTTPPort }} variables with the IP address and port of the HTTP server it spins up during the build process.
  # The time to wait after booting the initial virtual machine before typing the boot_command
  boot_wait = "10s"

  # Escape the GUI installer and use the autoinstall method
  boot_command = [
    "<esc><wait>",
    "e<wait>",
    "<down><down><down><end>",
    "<bs><bs><bs><bs><wait>",
    "autoinstall ds=nocloud-net\\;s=http://{{ .HTTPIP }}:{{ .HTTPPort }}/ ---<wait>",
    "<f10><wait>"
  ]
The http_content block is where we define the content that will be served by the HTTP server. Here we provide the file names and content, user-data and meta-data are the two files that cloud-init will look for when it starts up.
  # Provide content to the autoinstall Server
  http_content = {
    "/user-data" = local.user_data
    "/meta-data" = file("${path.root}/files/meta-data")
  }
The user-data file is sourced from a locals block, which allows us to use templatefile to inject packer variables into the cloud-init configuration file before it is served to the VM.
locals {
  user_data = templatefile("${path.root}/files/user-data.pkrtpl.hcl", {
    ssh_username        = var.ssh_username
    ssh_authorized_keys = join("\n", var.ssh_authorized_keys)
  })
}
Packer and terraform share a number of functions and syntax, templatefile is one of them. This allows us to use the same syntax for both tools,
☁️ Cloud-Init Configuration user-data.pkrtpl.hcl
The user-data.pkrtpl.hcl file is where we define the cloud-init configuration. This file is a template that will be populated with the variables we defined earlier.
Here we are setting the locale, keyboard layout, SSH settings, and packages to be installed. We also set the timezone and user configuration.
#cloud-config
autoinstall:
  version: 1
  locale: en_NZ
  keyboard:
    layout: us
  ssh:
    install-server: true
    allow-pw: true
    disable_root: true
    ssh_quiet_keygen: true
    allow_public_ssh_keys: true
  packages:
    - qemu-guest-agent  # Pre-installing QEMU guest agent
  # More configuration...
  user-data:
    package_upgrade: false
    timezone: Pacific/Auckland  # Setting timezone
    users:
      - name: ${ssh_username}
        groups: [adm, sudo]
        sudo: ALL=(ALL) NOPASSWD:ALL
        shell: /bin/bash
        ssh_authorized_keys:  # Pre-installing SSH keys
          - ${ssh_authorized_keys}
🧹 Preparing the Template
After the installation, several cleanup steps prepare the VM for templating:
provisioner "shell" {
  inline = [
    "while [ ! -f /var/lib/cloud/instance/boot-finished ]; do echo 'Waiting for cloud-init...'; sleep 1; done",
    "sudo rm /etc/ssh/ssh_host_*",
    "sudo truncate -s 0 /etc/machine-id",
    "sudo apt -y autoremove --purge",
    "sudo apt -y clean",
    "sudo apt -y autoclean",
    "sudo cloud-init clean",
    "sudo rm -f /etc/cloud/cloud.cfg.d/subiquity-disable-cloudinit-networking.cfg",
    "sudo rm -f /etc/netplan/00-installer-config.yaml",
    "sudo sync"
  ]
}
These cleanup steps are crucial for ensuring that each VM created from this template will have unique identifiers and configurations. Without them, you might encounter networking or SSH issues when deploying multiple VMs.
☁️ Overriding Cloud-Init datasource
We can override the default cloud-init datasource by creating a file called 99-pve.cfg in the /etc/cloud/cloud.cfg.d/ directory.
provisioner "file" {
  source      = "files/99-pve.cfg"
  destination = "/tmp/99-pve.cfg"
}

provisioner "shell" {
  inline = ["sudo cp /tmp/99-pve.cfg /etc/cloud/cloud.cfg.d/99-pve.cfg"]
}
The 99-pve.cfg file contains:
datasource_list: [ConfigDrive, NoCloud]
🚀 Running the Build
To build the template:
- Set the environment variables for authentication
- Create your variables file with the necessary configuration
- Run Packer:
packer init .
packer build .
The packer init command is important as it downloads and installs the required plugins specified in your configuration.
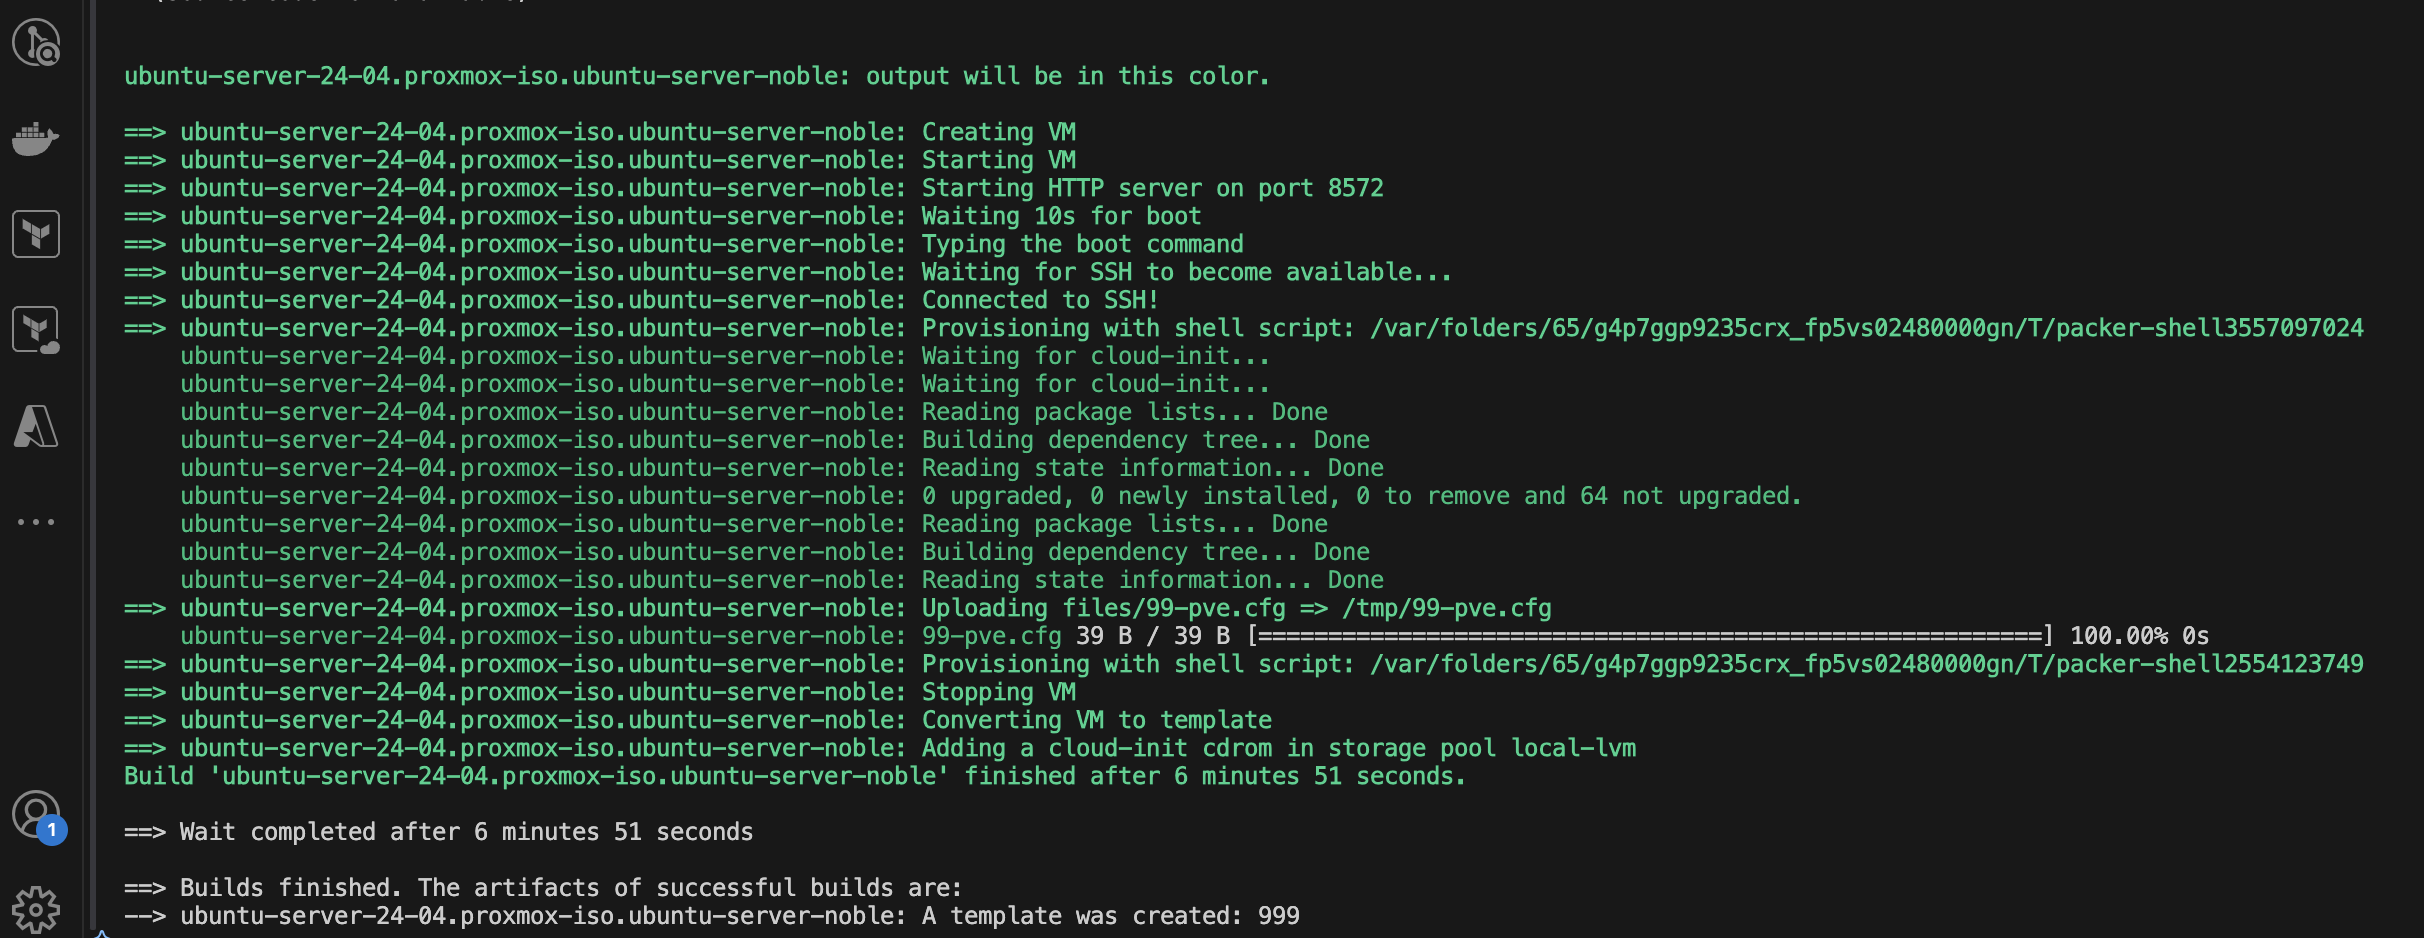
And there you have it! A fully functional Ubuntu Server 24.04 template for Proxmox, ready to be cloned and used in your homelab.
Shout out to Christian Lempa for his tutorial on Packer and Proxmox: https://www.youtube.com/watch?v=1nf3WOEFq1Y